3d drawing techniques in hindi

Learning
How to Create Your Ain Paw-Painted 3D Characters
Draw Your Weapons past Manuel Sitompul on Sketchfab Games accept always been a big interest for me. As a child I spent the majority of my fourth dimension exploring the story and worlds of Zelda, Pokémon and Rayman. I got so immersed in these worlds that I decided to start making
Games have always been a big involvement for me. As a child I spent the majority of my time exploring the story and worlds of Zelda, Pokémon and Rayman. I got so immersed in these worlds that I decided to start making my own by playing with Game Maker and learning GML.
However, my outset real game fine art experience started when I decided to study Visual Art at Breda University of Applied Sciences. At school I learned nearly the many sides of game art, such as: procedural modeling, 3D blitheness, standard asset creation and engine implementation. Experiencing this provided me with a good base to start making my own projects.
The Motivation
The journey started when I participated in a competition hosted by Yekaterina Bourykina. The challenge was to create a hand-painted character bosom. I ended upwards winning the competition and gaining tons of experience with hand-painting!

My Thoughts and Goals
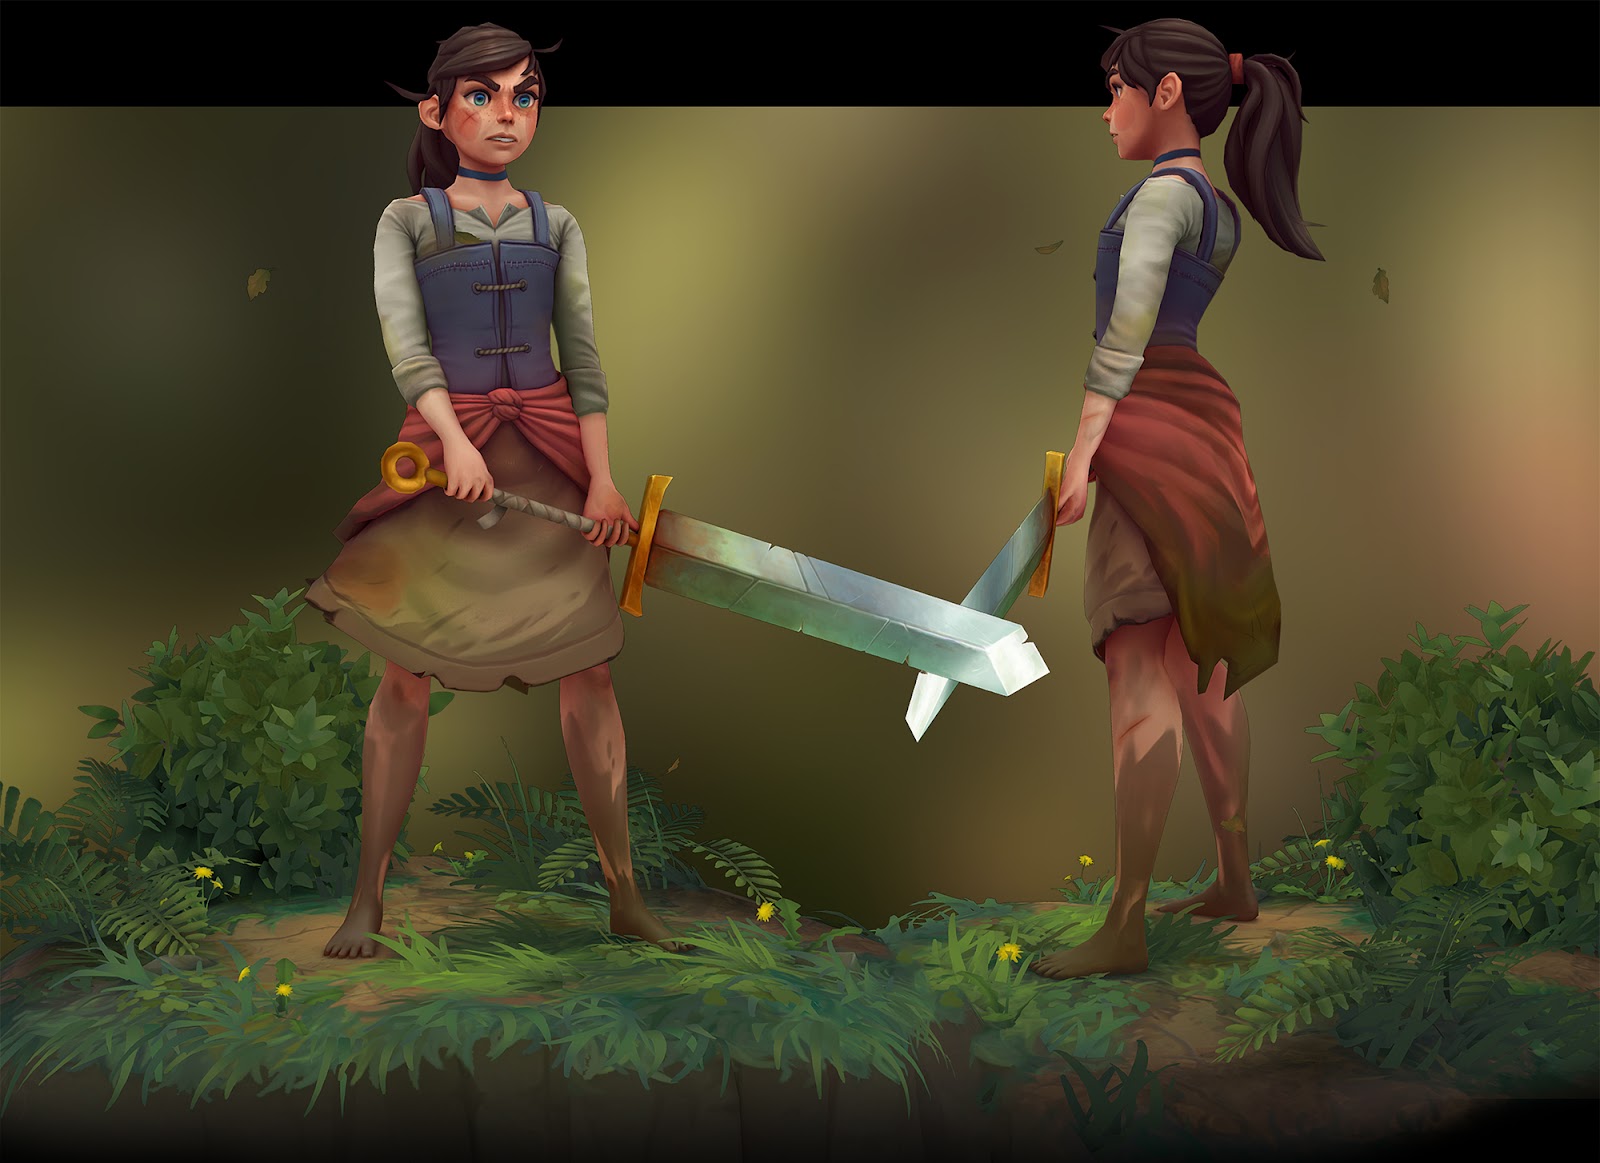
Afterwards the 3D bosom was received so well, I wanted to set the bar higher and create a total graphic symbol. I'm a big fan of Jake Wyatt and his Necropolis comic, and so I decided to create the protagonist from the comic.
The biggest affair I wanted to blast in this projection was the emotion. The girl is a ferocious character filled with rage, which she somewhen demonstrates by slaughtering a bunch of bad guys. Those kinds of emotions aren't easy to translate into a 3D model, simply I took it as a challenge.

Sculpting the Graphic symbol
I started the graphic symbol past creating a cake-out in ZBrush. Creating quick blobs in the shape of a homo allowed me to establish the beefcake and style pretty quickly.

I continued by Dynameshing the block-out and refining the basic shapes of the body. Adding muscular detail wasn't a priority because it was not all the same determined where the vesture pieces would embrace up the torso. Additionally, I didn't need to sculpt very detailed, because the sculpt would only be used for a diffuse bake which I could pigment over.

While sculpting the confront, it was very helpful to have some extra features in identify, such as eyebrows, eyelashes and hair. For the hair I used a haircurves brush, edited by Chris Whitaker, called makkon_haircurves_03. For the eyelashes and other pieces of special geometry, I modeled information technology in Maya and put it in ZBrush. I suggest anyone who is new to sculpting, if at that place's any job that seems easier in your preferred modeling software, it's probably worth information technology.

The girl from the comic has very dynamic and wrinkled habiliment, and then it took me some experimentation to figure out how to approach this problem. I started by creating a simple dress in Marvelous Designer, which allows me to create realistic creases in the wearable.

In the terminate I decided to sculpt all the vesture except the skirt. In this case I liked the corporeality of control I had past sculpting the folds past hand. Even though it isn't as realistic as a Marvelous Designer simulation, I could go away with it considering of the hand-painted nature of the project.
Using ZBrush to create the clothes was uncomplicated, I took the base of operations trunk, masked it, and used Subtool > Excerpt with a subtle Thickness. I continued by using the Standardbrush to pigment some folds.


Retopologizing the Character
When the sculpt was finished, it was fourth dimension to create a low-poly version which I could broil the sculpt on. I merged all my subtools with Merge > Merge Visible. Unfortunately, Maya doesn't like a 12 meg poly mesh, so I had to decimate the mesh using Decimation Primary to lower the poly-count a scrap.
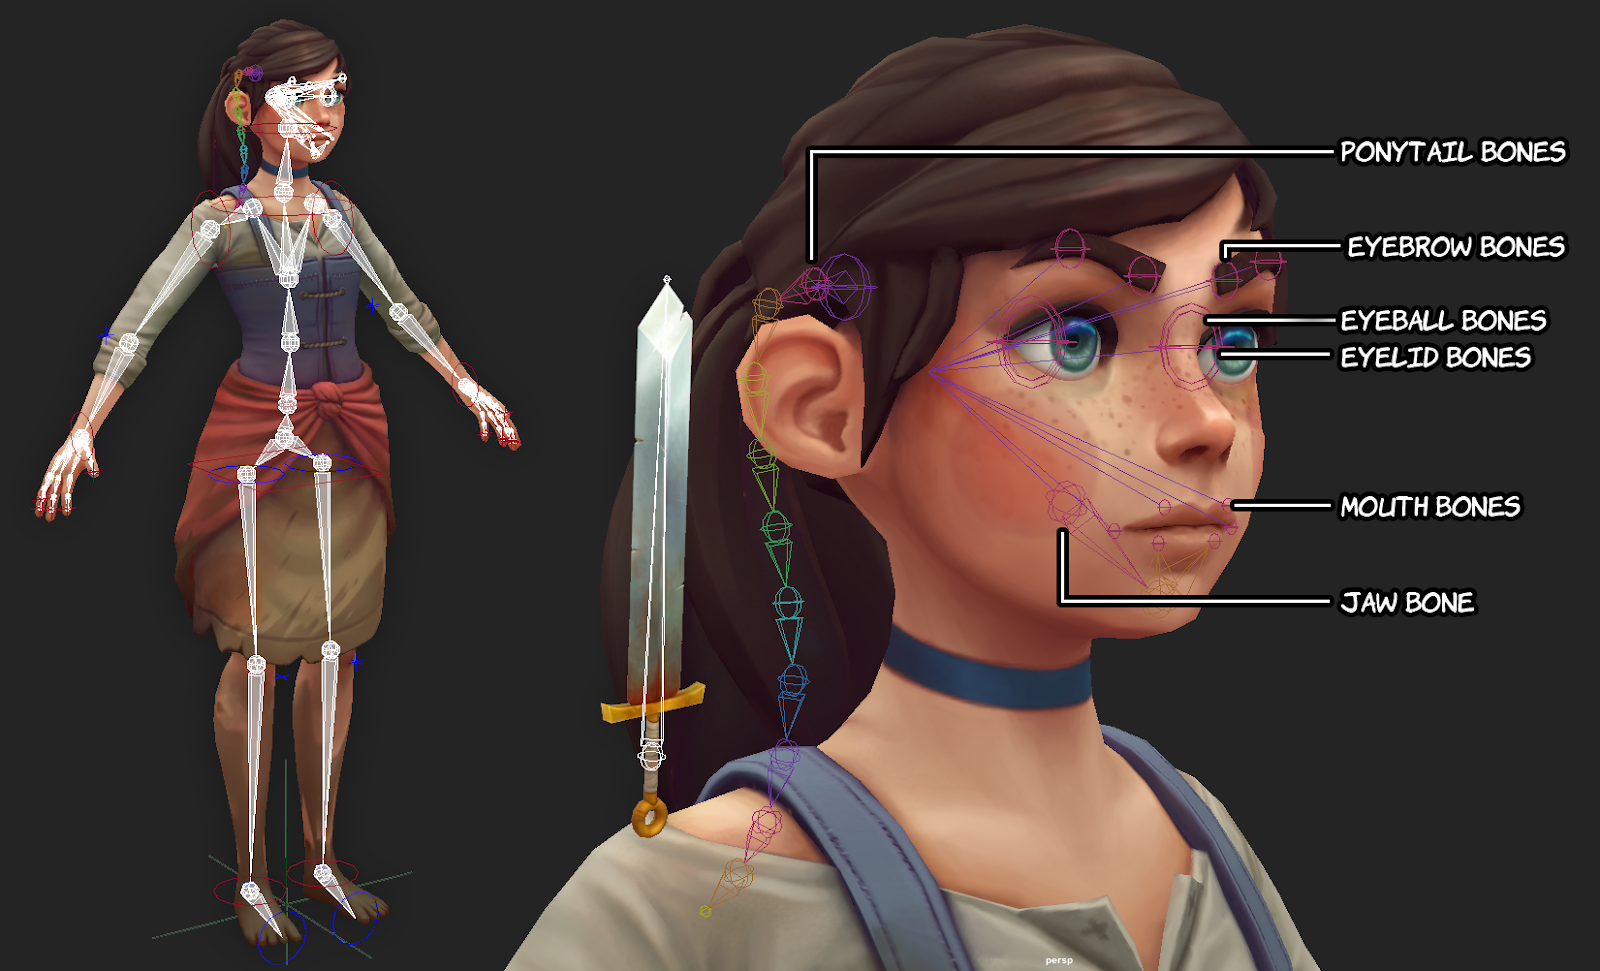
When the decimated model was in Maya, I fabricated the object live, and used Quad Draw to draw the faces on the mesh. I used this technique to retopologize the entire character. I concluded upwards connecting a lot of the vesture to the pare, which would help me peel the graphic symbol more hands, and result in less artifacts in blitheness.

Texturing the Graphic symbol
I started this project to build some feel doing hand-painted textures. Like my final manus-painted project, I used 3D Coat because of its dynamic link with Photoshop. 3D-Coat besides allows me to make projections of the 3D model, which I tin can paint over in Photoshop.
For this project, I decided on diffuse-just textures, which means the final product volition not collaborate with lighting in whatsoever mode. This means all the shadows, reflections and highlights must exist painted past hand.
To first off, I wanted to create some base colors and bones lighting. I imported my model into Substance Painter and baked the high-poly model on the low-poly. I continued by using an incredible smart-cloth called SoMuchDiffuse. This smart-material takes the high-poly sculpted information and bakes it downward into a single diffuse texture. Using this tool, I added base of operations colors and gradients for every role of the character.

This is where the manus-painting starts. I continued by exporting the new lengthened texture and importing it into 3D-Coat. My painting process is very straight-forrad. My master focus is ever to add more definition and highlight to the areas that I want the viewer to focus on. I started by painting lighter values fading from the middle of the face, which gives the face more depth. Additionally, I tried painting a lot of dissimilar hues in the face up such every bit reds, greens and blues. I care for this process no different than painting a character in a 2d illustration.

The eyes in particular were fun to make! The vertex in the center of the eyeball is going in to create a parallax effect. Additionally, there'southward a separate mesh for the cornea, on which I painted the optics' reflection. Because there'south altitude betwixt the reflection and the student now, the eyes have much more than depth.
Additionally, there'due south a separate mesh for the cornea, on which I painted the eyes' reflection.

I couldn't call the textures finished until the graphic symbol was rigged and posed. For example, changing the position of the artillery can create new shadows and creases which I demand to hand-paint. I proceeded to create a basic skeleton for the character and a few bones for the facial expression.
Settling on a pose and the facial expression took a while. Eventually I settled on a specific console from the comic (Affiliate 01, page 10), where the girl held a unproblematic just strong pose. When the posing was finished, I could paint the shadows and ambient occlusion, because I now knew which side of the limbs would face outwards.

The Environment
I think an important part of selling your graphic symbol is presentation. Y'all tin can spend hundreds of hours on a project, but if you lot don't present it right, people will miss out on what you made. For this project I cared a lot about emotion and immersion in character, so I tried to take that into business relationship when presenting. Adding a elementary pedestal wouldn't be very immersive, so I decided to create a minor animated woods environs around the daughter.

Retrospective
I have never done a hand-painting project this big, and it's safety to say information technology was quite a claiming. Getting all the materials to feel coherent while keeping the paw-painted details consistent took a long fourth dimension.
Nonetheless, the biggest challenge was the face. The character is supposed to be an angry and fierce immature adult female. Yet, I needed to sculpt her in a neutral pose so the character could be used in possible future scenes where she is conveying different emotions. In retrospect, I would've sculpted the character with her expression immediately, so I could get the feeling of the scene from the start. I could always resculpt the face up if I need new expressions.

Afterword
If y'all got this far, cheers for reading! I hope this inspires you lot to make something new! You tin can discover me on Artstation and Twitter. Feel complimentary to transport me a message if you have any questions!
Source: https://discover.therookies.co/2019/07/21/how-to-create-your-own-hand-painted-3d-characters/
Post a Comment for "3d drawing techniques in hindi"